| Feature |
The How To's |
Audio Improvement:Additive Animation
|
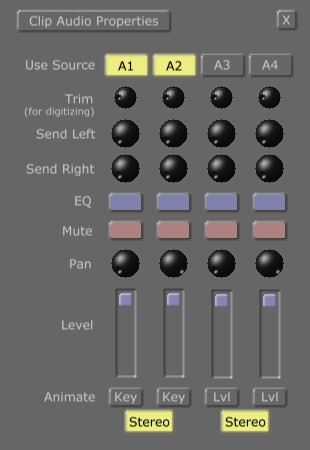
The Animate buttons of the Clip Audio Properties Panel were toggle buttons because they represented two states: Animate On or Animate Off.
Animate On means that the level of the audio is determined by the keyframes in the Level Track; Animate Off means that the Level Track is ignored and the audio level is constant and determined by the Level Slider in the panel.
In 3.1, the Animate button has been changed to a push button because it now represents three states:
- Constant Level: Similar to Animate Off, the audio level is specified by the Level Slider's value (not animated).
- Animated Audio: Similar to Animate On, the audio level is specified by the keyframes in the Level Track.
- Additive Animation: The audio level is animated using the keyframes in the Level Track and attenuated by the Level Slider
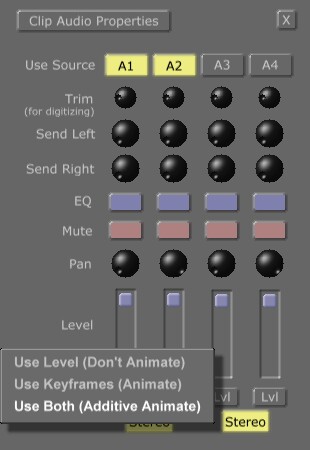
The text on the button represents the states: "Lvl" for Constant Level, "Key" for Animated Audio, and "Add" for Additive Animation. In the figure shown here, Audio components 1 & 2 use the keyframes to animate while audio components 3 & 4 (which are disabled) use the Level Slider to specify a constant level. When the Animate button is clicked, a pop-up menu appears to let you choose one of the three states.
|
Audio ImprovementImproved Keyframe Support
|
There are a number of minor audio improvements to smooth out the workflow.
As noted in the General Improvements section, you can select multiple keyframes by dragging a selection rectangle, and can edit mutliple keyframes in the Edit Keyframe dialog box.
Furthermore, just like using the left and right arrow keys to move the position of the selected keyframes, you can now use the up and down arrows to change the value of the keyframes.
|
4th Timeline Video Track
|
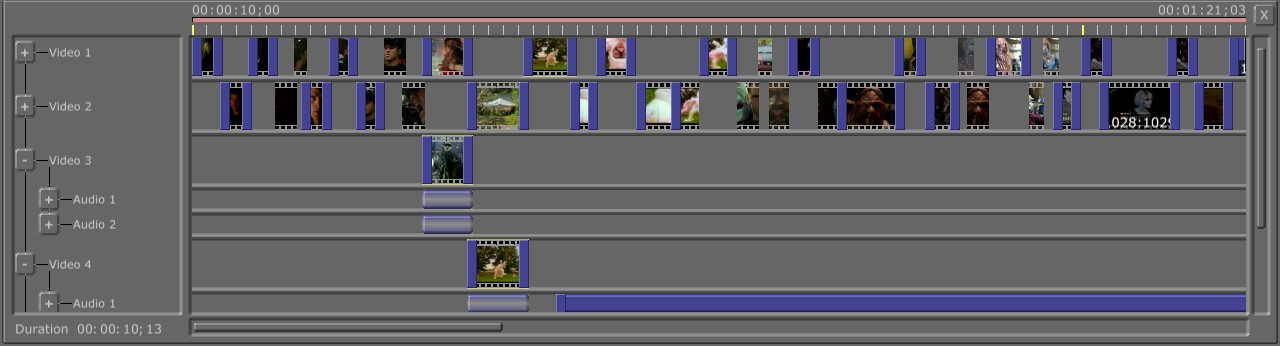
Support for a 4th video track has been added in the Editor timeline.
Since the GlobeCaster only supports three video channels at any given time, the fourth video track will usually be ignored; in fact, the Effect Properties Panel doesn't acknowledge the 4th video track as an option when choosing Video Tracks for a transition effect. However, the GlobeCaster does support eight audio channels, so the children audio tracks of the 4th video track can be very useful. There are a few other benefits that the 4th video track provides:
Emulates a clipboard
A video clip that the user intends to place in an active video track but whose position has not been determined can be
temporarily placed in the 4th video track. The advantage of having this in the timeline already is that you do not have
to go searching in the bins for the file. And it may provide a reminder to you that the clip has already been trimmed
properly so that you do not accidentally duplicate any work.
Case Study
"At one point, I was working on a timeline and saw a dissolve transition that I felt didn't quite work. I figured out a
possible solution for alternate video clips, but wasn't sure if I'd be happy with it. So I moved the clip on the Video 1 track to
the Video 3 track and the clip on the Video 2 track to the Video 4 track. Then I put my two new clips in the recently vacated spots
on Track 1 and Track 2. I played the timeline again with the new clips and still wasn't sure, but kept the timeline as it was and
continued work on other parts of the timeline. The advantage to this is that if I change my mind later and restore the original clips,
I don't have to go searching for an old, saved version of the timeline and merge it with my other changes."
Specify a range for Flattening
Sometimes, you want to flatten only a portion of the timeline rather than the entire timeline. And it may be that there is
no single event that can be used to properly specify the range to flatten.
Adding a 4th video track makes this easy. Simply drop the Matte Black object (or other video object) on the 4th video track, trim
the object so it properly specifies the range, right-click on the video object, and choose "Flatten Event" from the menu.
|
Extended Dissolve Properies
|
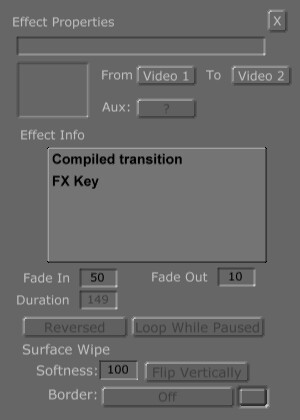
Dissolves created in 3.1 support a certain degree of customization so that they are not a simple ramp from full opacity (alpha = 0) to full transparency (alpha = 255). To customize a dissolve, right-click on the Dissolve object and select "Effect Properties..." to bring up the Effect Properties Panel. Edit the three following editboxes to customize your dissolve:
| Customizing Dissolve
| | Fade In | Duration (in frames) that alpha moves from 0 to the specified "hold" alpha value |
| Fade Out | Duration (in frames) that alpha moves from the specified "hold" alpha value to 255 |
| Softness | Indicates the "hold" alpha value of the dissolve. |
In the example shown here, the "hold" alpha value is 100; the dissolve will smoothly ramp from an alpha of 0 to 100 in 50 frames, hold at 100 for 89 frames, and then quickly, but smoothly, fade out from 100 to 255 in the 10 remaining frames.
|
Split All Accelerator key
|
An accelerator key has been added that allows the user to split all video tracks. Rather than selecting each clip on a video track and using the Split button or accelerator key [CTRL+S], the user simply has to use the Split All accelerator key [SHIFT+CTRL+S].
|
Options Toggle Button
|
The Options button is now a toggle button. The Options button will remain highlighted while the Editor Options Panel is open. The Editor Options Panel can now also be closed by toggling off the Options button.
|
New Accelerators
|
Added some new Editor accelerators, including a number of keyframe accelerators:
| Keyframe Accelerators
| | Ctrl+K | Toggle Keyframe |
| Alt+K | Go to/Select Next Keyframe |
| Shift+Alt+K | Go to/Select Previous Keyframe |
| Ctrl+Alt+K | Select Next Keyframe (additive) |
| Shift+Ctrl+Alt+K | Select Previous Keyframe (additive) |
| Up Arrow | Raise Selected Keyframes 1 unit |
| Alt+Up Arrow | Raise Selected Keyframes 10 units |
| Down Arrow | Lower Selected Keyframes 1 unit |
| Alt+Down Arrow | Lower Selected Keyframes 10 units |
| Miscellaneous Accelerators
| | Shift+Ctrl+S | Split All Video/Audio Tracks (Ctrl+S is Split one track) |
| Shift+Alt+Z | Go to Start |
| Shift+Alt+X | Go to End |
|