| Feature |
The How To's |
Save as Time Machine Clip
|
Effects that are simple graphic effects (i.e., have no warp data, video sources, or alpha) can now be saved to the Time Machine. Once a graphic effect has been created by the Make Effect button, the new Save to TM button (to the right of the "Save Now" button) should be enabled.
Simply click on the "Save to TM" button to save the effect to a Time Machine clip. (Note that this will only create a Time Machine clip, and will not save the project or the effect to a file.)
There are many reasons for doing this:
- Storing the effect on the TimeMachine drive no longer requires the extra load time of an effect being sent from the Host PC to the Switcher card
- There is more storage space available on the Time Machine's hard drives than there is on the Switcher card
- You can create a three-dimensional (3D), dynamic background for a virtual set
|
Tab Order
|
Added tab ordering to the EditBoxes in panels that have a lot of them, including the Object Creation, Texture Settings, and main tool panels
|
Auto Save
|
Limited autosave functionality has been added. When you click on the "Make Effect" button, the project is automatically saved to a local file.
If (after the effect has been made) the file is saved, the autosaved file is discarded since the project has been saved with the user-specified name. However, if for any reason the effect creation is aborted or the application is shut down without saving the project, the project has been automatically saved and will be automatically loaded when the application is started again.
|
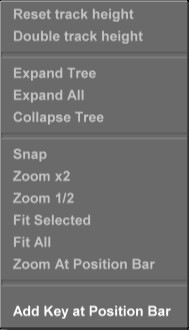
Add Key Menu Item
|
Added an "Add Key at Position Bar" menu item to the timeline's Track Pop-Up Menu.
This item, when selected, will add a new keyframe and control point(s) in the timeline where the position bar is located with the object's settings. If the mouse was in the Primitive Track (main parent track of the object) when the menu was invoked, a keyframe is created in the Primitive Track and a control point is created for every value track that belongs to the primitive/object.
If the mouse was in a value track when the menu was invoked, a keyframe is created in the Primitive Track and a control point is created only for that specific value track. This is useful for making fluctuations in a very small portion of the timeline: you can add a Key in the timeline at a given location, then add another Key a few frames later, and then start making changes to the object in between those two Keys without significantly affecting the behavior of the object anywhere else in the timeline.
|
Texture Settings Immediate
|
The Texture Graphics Panel has a Settings button that, when pressed, invokes a pop-up menu that allows the user to go to the Texture Settings panel
(by clicking on "Texture Settings") or the Movie Settings Panel (by clicking on one of the "Movie Settings" menu items).
However, if neither the Graphics nor Alpha is textured with a movie file, then only the "Texture Settings" menu item is available. So instead of popping up a single item menu, the Texture Settings Panel is automatically opened when the Settings button is pressed and released.
|
|